How to Build a Raised Garden Bed: A Step-by-Step Guide
Are you looking to grow your own garden but have limited space or poor soil quality? Or maybe you’re interested in sustainable living and want to create a healthy food garden for your home. In any case, a raised garden bed could be the solution you are looking for. In this step-by-step guide, I am going to walk you through creating a raised garden bed from the ground up. By the end of this post, you’ll be ready to enjoy the benefits of gardening in a smart and accessible way.
Introduction
A raised garden bed is a perfect way to have a controlled gardening space that requires less bending and squatting compared to traditional garden beds. The soil stays warmer longer, so you can start planting earlier in the spring. It’s also an excellent option for those with poor soil conditions or when contamination is a concern. Let’s get started by listing the benefits you can reap from building one, and the materials you’ll need to get going.
Benefits of a Raised Garden Bed
- Improved drainage
- Better soil conditions
- Protection from some pests
- Longer growing season
- Easier to maintain and harvest
Materials Needed
- Hammer, power drill, or screwdriver
- Level
- Tape measure
- Saw (I got mine pre-cut at Home Depot)
- Landscape fabric
- Bulk topsoil, compost, and/or organic potting soil
- Seedlings or seeds for planting
- Gardening gloves
Now, onto the first step: choosing a location for your garden bed.
Step 1: Choose a Location
Picking the right spot for your raised garden bed is crucial for the health and productivity of your plants. Consider the following factors as you make your selection.
Consider Sunlight, Water Access, and Convenience
- Choose a spot that gets at least six to eight hours of sunlight per day.
- Make sure the area is close to your hose or water source, as your garden will need regular watering, especially during the warmer months.
- Convenience is key, so select a location that is easily accessible so you will consistently tend to it
Don’t rush this step. Spending time finding the perfect location now will save you headaches later, remember, a raised bed cannot be moved once it is set up. I regret setting mine up nowhere near my back door! (Or any door!)
Step 2: Determine Size and Shape
The size and shape of your raised garden bed will depend on your available space, the types of plants you want to grow, and your own preferences.
Factors to Consider
- How many plants you want to grow
- The space available and the layout of your yard
- Your physical limitations (4 feet is a good width for reaching, you may need to create a deeper bed if you have back or knee troubles)
Common Dimensions
- The most common sizes are 4×4 or 4×8 feet, but you can adjust it to fit your needs.
- The height is flexible, but a depth of 10-12 inches is ideal.
By determining the size and shape of your garden bed now, you’ll avoid surprises later on.
Step 3: Gather Materials
When building a raised garden bed, having your materials ready is essential. For this project, you’ll need wood, screws, and soil.
List of Materials Needed
- Untreated, rot-resistant lumber like cedar or redwood (I used cedar wood)
- Galvanized screws
- Landscape fabric
- Soil mix
Ensure you have sufficient materials for the size and shape you’ve chosen, and double-check to ensure they are all non-toxic and safe for your garden.
Step 4: Prepare the Ground
Before you start building, you need to prepare the ground where your garden bed will be located.
Clear the Area
- Remove any grass or vegetation from the site.
- Consider using a garden tarp to smother grass and weeds over several weeks before building.
Level the Ground
- Use a level to check for any uneven areas and dig down or add soil as needed to create a flat surface for your garden bed.
Don’t skip this part! It may not seem that important, and honestly may not be, but for aesthetic reasons you will want to have a nice level surface.
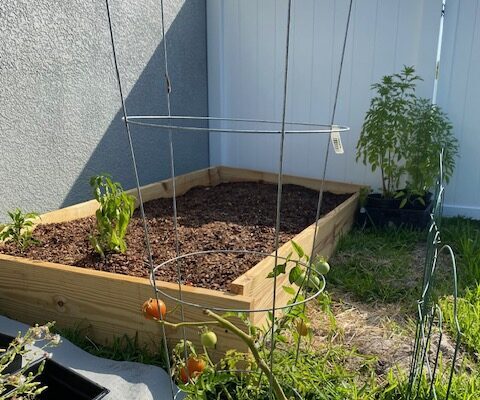
Step 5: Build the Frame
The frame is the structure that will contain the soil in your garden bed.
Assembly Instructions
- If using pre-cut lumber, you may only need to screw the pieces together.
- If cutting your own lumber, measure and cut the pieces to fit your chosen size and shape, then screw them together.
Options for Different Materials
- If you prefer not to use wood, you can construct the frame with bricks, cinder blocks, or stone.
- There are also pre-made frames available in various materials, these are sometimes really beautiful, but can also be super pricey.
When building the frame, keep in mind that it should be sturdy enough to hold the weight of the soil and plants.
Step 6: Add Soil and Amendments
Proper soil is the foundation of a successful garden.
Recommendations for Soil Mix
- A blend of topsoil, compost, and organic potting soil offers a good balance of nutrients and drainage. I also mix in some dry fertilizer or some of my favorite organic soil hacks.
- A mix of one-third each of these soil types is a great starting point.
Step 7: Planting and Maintenance
With your raised garden bed built and filled with soil, it’s time to bring your garden to life.
Tips for Planting in a Raised Bed
- Create rows and mounds in your soil to plant your seeds or seedlings.
- The square foot method makes raised bed gardening super simple!
- Space plants according to the recommendations on the seed packet or plant tag.
Conclusion
Building a raised garden bed is an exciting project that enables you to enjoy the benefits of gardening in a new way. It’s an opportunity to grow delicious, nutritious food, connect with nature, and practice sustainable living. As you’ve seen, the process is straightforward, and the maintenance is manageable. It’s time to roll up your sleeves and get started. Your green thumb awaits!
Happy growing my friends!
More Information:
My post on Beginner Gardening Tools
This video by James from The Gardening Channel With James Prigioni was a super helpful visual guide for me!